Already own a domain you want to use? You can connect it to your Holidu booking website in six steps and start promoting your rentals under your own brand. Before you begin, make sure you can log in to your domain provider's settings (for example AWS or Vercel). Keep in mind that any website currently live on that domain will be replaced by your direct booking website.
What you need before you start
- Access to the DNS settings of your domain provider
- Your domain name, for example yourdomain.com
- About 15 minutes to add records and wait for verification
Important: If a website is already live on your domain, it will stop working for guests once you complete this process. Make sure you are ready to switch over before you start.
Step-by-step guide to connecting your domain
Step 1: Start the process in the Holidu app by setting up your booking website
- Click Enable website if it is not enabled yet.
- Click Connect my domain.

- After you enter your existing domain name, a DNS tab appears.
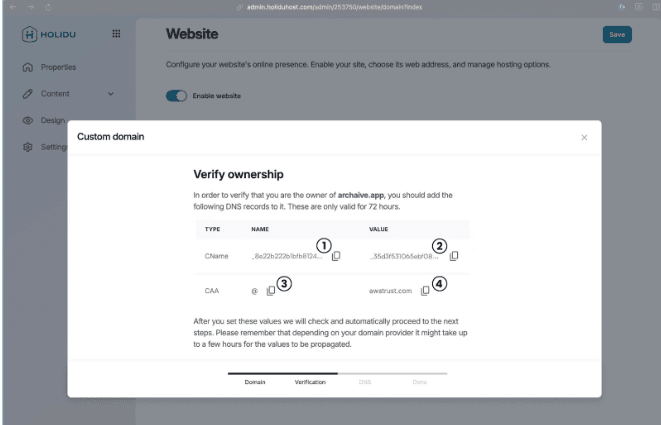
Holidu generates a few specific DNS values for your domain. Copy these values and keep them open, because you will add them to your domain provider in the next step.
Tip: Don't worry if you are not familiar with DNS settings. Step 2 walks you through each field.
Step 2: Create a new CNAME record in your domain settings
Log in to your domain provider and look for the option to create a new record (or DNS record). A form will open.
- For Type, select CNAME.
- In the Holidu app, copy the NAME value from the CNAME line (1) and paste it into the name field of the new record.
- Copy the VALUE from the same line (2) and paste it into the value field.
- The TTL and Routing policy fields can usually keep their pre-filled values.
When everything is filled in, create the record.
Example (AWS):
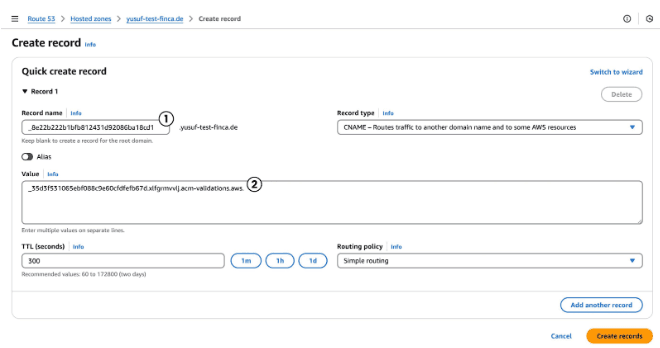
Important: If your domain already has DNS records, delete them before you create this one. Deleting them disconnects your existing website from the domain, so guests will no longer be able to reach it. This step is required to link the domain to your new direct booking website.
Step 3: Add a CAA DNS record in your domain settings
Create one more record in your domain settings. This time:
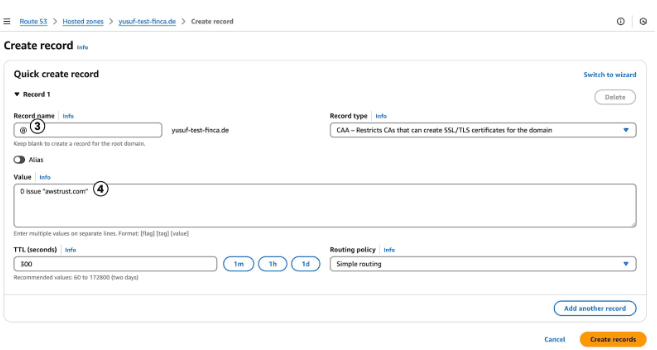
- For Type, select CAA.
- In the Holidu app, copy the NAME value from the CAA line (3) and paste it into the name field.
- Paste the value from the Holidu app (4) into the value field.
- Some providers require a special format in the value field, for example: 0 issue "awstrust.com". If your provider asks for this format, put the value (4) inside quotation marks.
- The TTL and Routing policy fields can usually keep their pre-filled values.
When the settings are complete, create the record.
Step 4: Return to the Holidu app to check that the records are recognized
Once the CNAME and CAA records are in place, Holidu checks your DNS settings automatically. This usually takes about 5 minutes.
If everything is correct, your domain is verified and the app guides you to the final part of the setup.
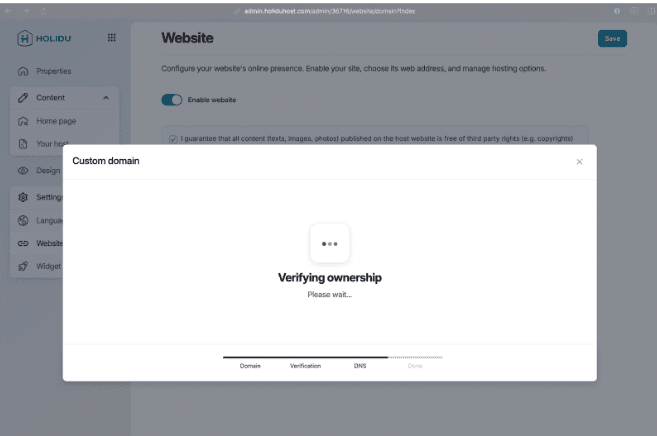
Not verified yet? Check that the NAME and VALUE fields match the Holidu app exactly, and that no old records conflict with the new ones. DNS changes can take a little time, so wait a few minutes and check again.
Step 5: Add an ALIAS DNS record in your domain settings
After Holidu verifies your domain, you need to add one last DNS record. The Holidu app shows the values you need:
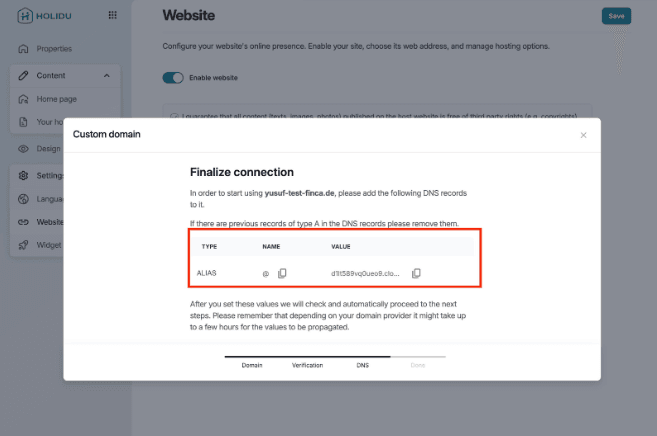
- Create a new record in your domain provider.
- Change the Type to ALIAS.
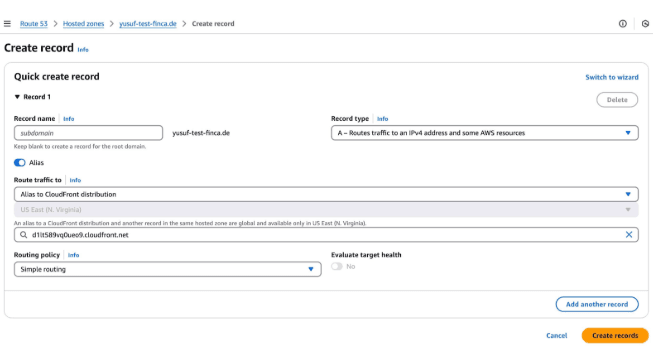
- Enter the values from the Holidu app and create the record.
Before you move on, check that your domain provider now includes all three of these records:
- ALIAS
- CAA
- CNAME
All three are needed for your direct booking website to connect properly.
Step 6: Complete the final verification
Return to the Holidu admin interface and wait until the domain status shows as verified.
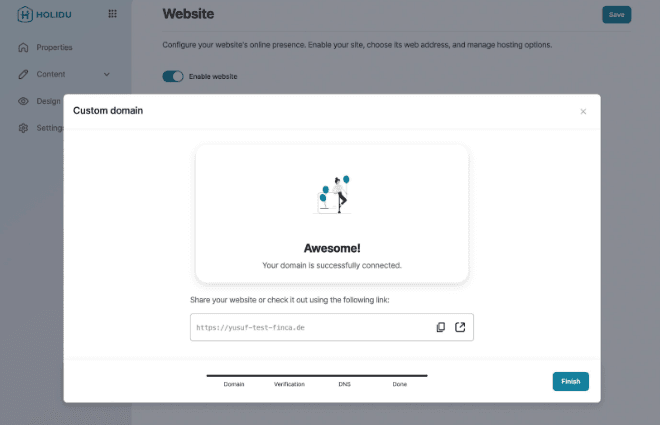
Once verification is complete, you can open your direct booking website using your own domain. Try it in a private browser window to confirm that it loads correctly.
Frequently asked questions
How long does it take to connect my domain to Holidu?
Most hosts finish the setup in under an hour. DNS record changes and Holidu's automatic check usually take about 5 minutes each, but DNS changes can sometimes take longer to update across the internet.
Will my old website stop working?
Yes. Once you replace the existing DNS records with the Holidu records, your old website will no longer be accessible on that domain. Your direct booking website replaces it.
What if my domain provider asks for a different format?
Some providers require quotation marks around the CAA value, such as 0 issue "awstrust.com". If your provider asks for a specific format, follow its instructions and keep the values from the Holidu app unchanged.
Need more help?
If you get stuck at any step, contact the Holidu support team. Have your domain provider name and a screenshot of your DNS records ready so we can help you faster.
Do you want to contact us?
We’re here to help. You can contact us directly if you need assistance or have questions.
Contact us